What are SSH host keys and how to manage them?
SSH host keys are a simple solution used for authentication between servers and clients. However, hand in hand with simple solutions challenges usually come along. The common problem with SSH host keys is that they need to be regularly changed.
Read on to learn what are SSH host keys and how to manage them effectively with best practices in mind.
Contents
2. The problem with SSH host keys
3. Why do SSH host keys occasionally change?
4. Best practices for SSH host key management
What are SSH host keys?
SSH host keys serve as the default SSH server identification for connecting SSH clients. They are the default machine identity generated when an SSH server is installed.
Analogous to user SSH keys, host keys represent the server’s identity and are used for authentication towards the connecting client.
When accessing a server for the first time, SSH clients will typically pause the connection, display a hash of the identity a.k.a the host key (A), and prompt the user to explicitly accept it (B) before proceeding with the connection.

The problem with SSH host keys
In short, SSH host keys occasionally change and when it happens your automation flows relying on SSH connectivity is brought to a stop.
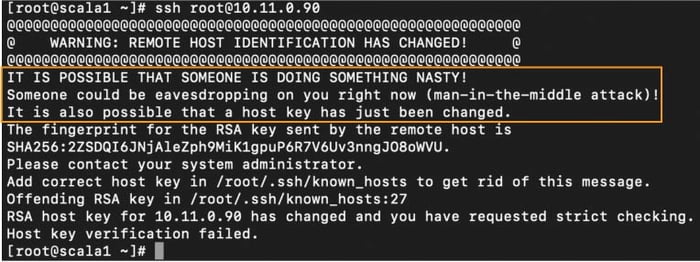
Upon confronted with an SSH host key change, SSH clients will, irrespective of what caused the change, block the connection and display the warning. The client mandates explicit action before connection to the server in question can be resumed. In a way, the SSH client places the server with a changed SSH host key in a quarantine.
This is important because, without an out-of-bound verification, legitimate changes to SSH host keys are indistinguishable from a Man-In-The-Middle (MITM) attack. When the SSH client detects a host key change, it will refuse to proceed with the connection. Instead, it displays the following error message:
Such interruptions pose a problem, especially in machine-to-machine connections where the automated flow disruptions may not be immediately recognized. With interactive connections, the disruption is observed by a user but often it requires in-depth knowledge to securely rectify the issue.
There is no shortage of people reaching out for help on how to get rid of that pesky "WARNING: REMOTE HOST IDENTIFICATION HAS CHANGED" on the interwebs.
And therein lies the problem.
All too frequently users opt to fix the interruption without due diligence verifying whether the change is legitimate. Also, poor planning of legitimate SSH host key changes in the environment can cause users to become accustomed to the warnings that increase the risk of tricking users into accepting a changed host key during a MITM attack.Why do SSH host keys occasionally change?
A host keys change may be triggered by a number of reasons. For example:
- Hosts get re-built (virtualization, cloud servers) without retaining their SSH identity.
- Reusing FQDNs or IPs in the environment.
- IT personnel retires or rotates old host keys.
- A default key encryption algorithm is deprecated in a newer SSH server version which forces a change of the SSH host key used (e.g. DSA keys were deprecated in most SSH server products several years ago due to security concerns with the strength of the algorithm).
- The user is in fact facing a MITM attack, where through spoofing, a malicious server is pretending to be the server to which the user is usually connecting. The connection is routed to the malicious server instead and as the hostile server’s identity is different, this causes an expected SSH host key change warning.
Best practices & recommendations on SSH host key management
1. Create a database
Create an authoritative database of current server identities that can be accessed by individuals so that they can compare the identity presented during the very first connection with the authoritative list. Server identities do change so keeping the database up to date is imperative.
2. Verify first-time connections
When connecting to a server for the very first time, users should verify out-of-band the presented identity. This can be accomplished, for example, by calling IT support or comparing the presented identity with an entry from a trusted database.
That is because the host key identity is not similar to a passport. By comparison, a passport is issued by a third party, the police, that we explicitly trust. An equivalent to that would be a digital certificate issued by a trusted third party, known as a certificate authority (CA).
A host key is the default SSH server identity, and it is crucial in establishing a secure, encrypted connection with the SSH client. However, because the host key, is a self-issued identification, it is strongly advisable that the user seeks external confirmation (e.g. IT support) that this really is the expected identity. This is done to minimize the risk of MITM attacks where the user unintentionally logs into a hostile server.
3. Verify SSH host key changes
Similarly, when the user is presented with a “remote host identification has changed” warning, the recommended action is for users to consult the list of server identities or contact their IT and verify that the host key change was legitimate and verify the new identity.
4. Rotate SSH host keys
Just like user keys, SSH host keys should be rotated regularly.
Summary
All-in-all, SSH host key changes do happen and cause havoc to both automation flows and interactive SSH access, while increasing the risk of falling victim to MITM attacks.
Our Universal SSH Key Manager (UKM) solution is capable of collecting data to help inform your decisions and perform tasks that would be virtually impossible to collect or perform manually.
Benefits of centralized SSH host key management:
- Know your server inventory.
- Centrally orchestrate the rotation of SSH host keys and automatically notify clients of the changes to prevent connection disruptions.
- Perform targeted client updates for improved performance.
If you’re looking for a user-friendly and easy-to-use SSH key management solution, check out our Universal SSH Key Manager or get in touch with us.

